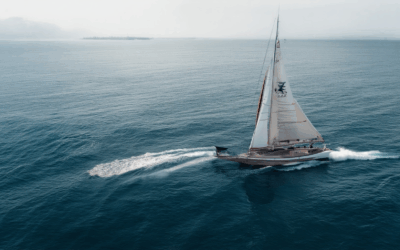
Are you someone who loves sailing but struggles with capturing the perfect shot of your yacht? Whether you’re a professional photographer or a hobbyist, mastering yacht photography tips can elevate your shots from ordinary to extraordinary. From understanding the 3:1 rule to choosing the right camera settings and lenses, this guide will walk you through everything you need to know to take stunning photos of your yacht. Discover how to make the most of your next photoshoot, whether you’re cruising along the coast or sailing across the open sea. With expert advice and practical tips, you’ll be ready to capture the beauty of yachting like never before. Let’s dive in and explore the secrets to creating breathtaking yacht photography!
Key Takeaways
– Wide-Angle Prime Lens: Optimize boat details with shallow depth-of-field and low-light performance, ideal for Nikon AF-S FX 50mm f/1.8.
– Telephoto Lens: Capture dynamic perspectives and distant subjects with compression using the Canon EF 70-200mm f/4L IS III.
– Macro Lens: Get extreme close-ups of boat details, perfect for Nikon AF-S DX 60mm f/2.8G.
– Wide-Zoom Lens: Versatility for wide angles and medium telephoto with the Sony FE 24-70mm f/2.8 II.
– Stabilized Lens: Enhance low-light performance and reduce motion blur with the Olympus M.Zuiko 40-150mm f/4-5.6 II.
– Standard Zoom Lens: Essential for everyday photography, covering wide-angle to medium telephoto with a 24-70mm option.
– Telephoto Lens: Perfect for isolating subjects and adding depth, ideal for wildlife and sports with a 70-200mm lens.
– Lens Tints: Boost visibility and reduce glare—choose blue, green, polarized, brown, or gray lenses for optimal boating conditions.
These tips and tools will help you master yacht photography, ensuring you capture stunning visuals and telling stories through your lens.
What is the 3:1 Rule in Photography?
The 3:1 rule, often referred to as the rule of thirds, is a fundamental composition guideline in photography. It suggests dividing the scene into three equal horizontal sections, creating a 3:1 aspect ratio. The subject is typically placed within one-third of the frame, usually on one side, leaving the remaining two-thirds open. This creates a sense of balance and draws the viewer’s eye towards the subject.
Why Does the 3:1 Rule Work?
The rule of thirds works because it naturally divides the frame in a way that is visually appealing and easy to compose. By placing the subject in one-third of the frame, photographers often achieve a more dynamic and engaging composition. This rule is particularly useful for portrait photography, landscape photography, and other genres where symmetry plays a role.
When to Apply the 3:1 Rule
While the 3:1 rule is a helpful guideline, it is important to recognize that it is not always perfect. In some compositions, breaking the rule can lead to more impactful and creative results. For example, in high-energy or dynamic scenes, placing the subject closer to the edge or off-center can convey movement and excitement more effectively.
Examples of the 3:1 Rule
- In portrait photography, position the subject so that their eyes are aligned with the left or right third of the frame.
- In landscape photography, use the rule of thirds to frame the horizon or foreground elements.
- In macro photography, apply the rule to isolate details within the frame.
Breaking the Rule for Creativity
While the 3:1 rule is a great starting point, don’t hesitate to experiment and break the rule when necessary. Asymmetrical compositions, extreme perspectives, and unique framing can yield stunning results. Remember, the most important aspect of photography is to tell a story or convey an emotion, and sometimes the rule needs to be adjusted to achieve that.
By mastering the 3:1 rule and understanding when to bend it, photographers can create more compelling and visually interesting images.
How to Take Pics on a Yacht?
Capturing stunning shots on a yacht requires a blend of creativity, preparation, and technical know-how. Here’s a step-by-step guide to help you make the most of your photography sessions on the water:
-
Choosing the Right Equipment
- Invest in a high-quality camera with a wide-angle lens for capturing the vast expanse of the sea.
- Bring a tripod for stability, especially on a moving yacht.
- Carry extra batteries and memory cards to ensure you don’t miss a moment.
- Consider bringing a waterproof camera case for safekeeping.
-
Composition Techniques
- Apply the rule of thirds to frame your shots creatively.
- Use leading lines (like the horizon or the yacht’s railing) to add depth to your images.
- Experiment with symmetry, especially when the yacht is stationary or moving smoothly.
-
Timing and Lighting
- Shoot during the golden hour for soft, natural lighting that enhances colors.
- Avoid shooting directly into the sun to prevent overexposure and glare.
- Use available light creatively, such as during early morning or late afternoon.
-
Staying Steady
- Use the yacht’s sturdy areas, like the bow or upper deck, for better stability.
- Practice panning shots to capture motion blur effectively.
- Keep your camera movements smooth and deliberate to avoid blurring your images.
-
Post-Processing Tips
- Edit your photos to enhance color balance and contrast.
- Remove unwanted objects or people from your frames.
- Adjust exposure and shadows to bring out details in the background.
-
Community Resources
- Explore our photography tips section for more advanced techniques.
- Join our community to share your yacht photography experiences and get feedback.
- Discover inspiring stories and galleries on our blog .
Boat Photography Camera Settings and Tips
To capture stunning shots from a boat, consider these settings and techniques:
- Shutter Speed: Set your shutter speed to at least 1/1000 seconds. Increase it to 1/2000 or higher if the boat is moving quickly or the water is rough.
- Aperture: Use a large aperture (e.g., f/8) to blur the background effectively and isolate your subject.
- ISO: Keep ISO set to Auto with a maximum of 12800 to handle changing light conditions without excessive noise.
- White Balance: Regularly adjust white balance to match the changing light, especially during transitions between sunny and cloudy conditions.
- Composition: Utilize leading lines like the boat’s bow or horizon to guide the viewer’s eye through the frame. Add foreground elements like ropes or masts for added interest.
- Focus Modes: Use AF-S or AF-C modes to maintain sharpness on moving subjects, such as crew members or the boat itself.
- Storage: Carry extra memory cards and a backup battery to ensure you’re prepared for extended shooting sessions.
- Weather Considerations: Adjust settings for wind conditions; faster shutters help mitigate movement caused by strong winds.
- Lens and Camera Choice: Opt for full-frame cameras for better low-light performance. Consider investing in an ND filter for long exposures if desired.
Experiment with these settings and compositions to find your personal style. Happy shooting!

The Best Lens for Boat Photography
For boat photography, selecting the right lens is crucial to capture the intricate details, dynamic movements, and unique perspectives of boats and their surroundings. Here’s a breakdown of the best lens options:
1. Wide-Angle Prime Lens
A wide-angle prime lens, such as the Nikon AF-S FX 50mm f/1.8 , is ideal for boat photography. Its wide aperture allows for shallow depth-of-field, emphasizing textures and details on the boat, such as ropes, hulls, and reflections. The large aperture also enables low-light performance, making it perfect for shooting during early mornings or late afternoons.
2. Telephoto Lens
For capturing distant subjects or compressing the boat’s perspective, a telephoto lens like the Canon EF 70-200mm f/4L IS III is excellent. This lens provides a natural compression effect, making the boat appear more dynamic and focused. Its Image Stabilization feature ensures sharp images even when the boat is moving.
3. Macro Lens
If you’re interested in extreme close-ups of boat details, a macro lens such as the Nikon AF-S DX 60mm f/2.8G is perfect. This lens allows you to capture minute details, such as the texture of ropes, the reflection in water droplets, or intricate metalwork on the boat.
4. Wide-Zoom Lens
A versatile option is the Sony FE 24-70mm f/2.8 II . This wide-zoom lens offers a balance between wide-angle and telephoto capabilities, allowing you to capture both the vast expanse of the sea and detailed features of the boat. Its constant aperture ensures consistent performance across its range.
5. Stabilized Lens
For low-light conditions, consider the Olympus M.Zuiko 40-150mm f/4-5.6 II . This lens features built-in stabilization and a variable aperture, which is particularly useful when photographing moving boats in dim lighting.
Comparison Table
| Lens Type | Aperture | Focal Length | Weight | Best For ||———————-|————–|——————|————|——————————————————————————-|| Wide-Angle Prime | f/1.8 | 50mm | 0.9 kg | Capturing fine details and textures || Telephoto | f/4 | 70-200mm | 1.4 kg | Compressing perspective and capturing distant subjects || Macro | f/2.8 | 60mm | 0.5 kg | Close-ups of small details || Wide-Zoom | f/2.8 | 24-70mm | 1.2 kg | Versatile for wide angles and medium telephoto || Stabilized | f/4-5.6 | 40-150mm | 1.0 kg | Low-light and motion blur prevention |
Each of these lenses excels in different aspects of boat photography, allowing you to experiment and find the perfect setup for your style. Whether you prioritize detail, dynamic composition, or low-light performance, there’s a lens that will enhance your photography.
Essential Lenses for Every Photographer
When equipping yourself for photography, having a solid set of versatile lenses is crucial for capturing a variety of scenes. Here are two lenses that every photographer should consider:
- Standard Zoom Lens (24-70mm) : A versatile all-rounder, this lens provides excellent coverage from wide-angle shots to medium telephoto work. It’s perfect for everyday use, capturing landscapes, portraits, and documentation.
- Telephoto Lens (70-200mm) : Ideal for isolating subjects and adding depth to your shots, this lens is a must-have for wildlife, sports, and architectural photography. It excels in low-light conditions and offers impressive bokeh.
These two lenses form a solid foundation, allowing you to adapt to various shooting situations while maintaining high-quality results. Whether you’re documenting adventures on the water or capturing the beauty of nature, having these lenses will enhance your ability to tell your story through photography.
Lens Tints for Boating
Choosing the right lens tint for boating involves considering factors like glare reduction, UV protection, and visibility enhancement. Here are some recommendations:
- Blue Lens: Enhances visibility in water, making it easier to see fish and underwater obstacles. Popular among anglers and watersports enthusiasts.
- Green Lens: Similar to blue, green lenses also boost visibility under water, particularly in murky or greenish environments.
- Polarized Lenses: Excellent for reducing glare from the sun and water reflections, improving clarity and comfort during long days on the water.
- Brown Lens: A versatile choice that provides excellent all-around vision, suitable for both bright and cloudy conditions.
- Gray Lens: Offers neutral coverage, reducing glare effectively while maintaining true color perception.
For the best boating experience, consider brands like Oakley and Costa Del Sol , which specialize in high-quality polarized and protective lenses designed specifically for outdoor activities.
Conclusion: Blue and green lenses are ideal for water activities, while polarized options provide superior glare reduction. Choose a combination that suits your specific needs and environmental conditions.

0 Comments